Difference between revisions of "Getting Start with EX400 Thin Client"
(Created page with "The following is a quick start guide to get you started with the RX-HDX thin client solution. Once you complete these steps, you will be eligible to: * Gain access to NoTouch...") |
|||
| (16 intermediate revisions by the same user not shown) | |||
| Line 1: | Line 1: | ||
| − | The following is a quick start guide to get you started with the | + | '''IMPORTANT NOTE:''' |
| + | |||
| + | ''As of July 1, 2020, NComputing has formed a new partnership with Stratodesk, making the official Stratodesk branded OS and management center available on NComputing devices. | ||
| + | |||
| + | Enterprises and organizations using NComputing thin client products based on NoTouch OS, including RX-HDX, RX-HDX+, RX420(HDX), RX420(STDK) and EX400, can now easily migrate over to the official Stratodesk image. | ||
| + | |||
| + | Please refer to the following [https://www.stratodesk.com/migrate-to-stratodesk-and-get-the-full-power-of-notouch-on-ncomputing-thin-clients '''helper guide on how to access the latest NoTouch software (NoTouch OS firmware and NoTouch Center)'''] from Stratodesk.'' | ||
| + | |||
| + | <br> | ||
| + | <br> | ||
| + | |||
| + | The following is a quick start guide to get you started with the EX400 thin client solution. | ||
Once you complete these steps, you will be eligible to: | Once you complete these steps, you will be eligible to: | ||
| − | * Gain access to NoTouch Center and unlock the 1-year bundled software maintenance update subscription that comes with your | + | * Gain access to NoTouch Center and unlock the 1-year bundled software maintenance update subscription that comes with your EX400 purchase to access future software and EX400 firmware updates |
| − | * Extended default | + | * Extended default EX400 hardware warranty (extending the standard 1-year from the date of manufacture warranty to 1-year from the first time seen by NoTouch Center) |
| − | * Asset management of deployed | + | * Asset management of deployed EX400 devices with NComputing Management Portal and expedited hardware warranty claims<br> |
| + | [[Image:EX400_front.png|175px]]<br> | ||
| + | '''IMPORTANT NOTE: | ||
| + | * The EX400 thin client comes with a native dual display with resolutions up to 4K Ultra HD. By default, the system will output the same image on both screens ("'''cloned'''" mode in our terminology) which is usually a safe bet and also works if there is only one monitor connected. In an office scenario where you have two monitors next to each other, you most probably want to have both monitors being part of a large logical desktop, this is called "'''merged'''" mode. Please refer to the [[Multimonitor|'''Multimonitor''']] section for instructions. <br> | ||
| + | |||
| + | |||
== Step 1. Create a new NComputing Management Portal account == | == Step 1. Create a new NComputing Management Portal account == | ||
| − | This is where you will be able to register and manage your | + | This is where you will be able to register and manage your EX400 devices and download NoTouch Center and future software/firmware upgrades |
Go to [http://www.ncomputing.com NComputing], click on login|register to create NComputing Management Portal account for your company. | Go to [http://www.ncomputing.com NComputing], click on login|register to create NComputing Management Portal account for your company. | ||
| − | <br>[[Image: | + | <br> |
| + | <br>[[Image:NComputing_main_page2.png|800px]]<br><br> | ||
After login, you can find the button for NComputing Management Portal | After login, you can find the button for NComputing Management Portal | ||
<br>[[Image:NComputing_ManagementPortal.JPG|border|800px]]<br><br> | <br>[[Image:NComputing_ManagementPortal.JPG|border|800px]]<br><br> | ||
| Line 13: | Line 30: | ||
== Step 2. Download NComputing Virtual Appliance (which includes NoTouch Center installation) == | == Step 2. Download NComputing Virtual Appliance (which includes NoTouch Center installation) == | ||
Once you have created an NComputing Management Portal account, you will be able to download the NComputing Virtual Appliance. | Once you have created an NComputing Management Portal account, you will be able to download the NComputing Virtual Appliance. | ||
| − | The [[NComputing Virtual Appliance]] is a 64bit Linux-based Virtual Appliance (VA) preconfigured to run in a virtual machine environment. It includes [[Short introduction (NTC)|NComputing NoTouch Center]] to manage | + | The [[NComputing Virtual Appliance]] is a 64bit Linux-based Virtual Appliance (VA) preconfigured to run in a virtual machine environment. It includes [[Short introduction (NTC)|NComputing NoTouch Center]] to manage EX400 thin clients plus an easy-to-use web-based administration interface to perform tasks such as updating or backing up the Virtual Appliance. |
| + | |||
=== To download NComputing Virtual Appliance === | === To download NComputing Virtual Appliance === | ||
Login to [http://www.ncomputing.com NComputing website] using your account created in step 1. Then, click on the ‘management portal’ link on the top menu to access the NComputing Management Portal. <br> | Login to [http://www.ncomputing.com NComputing website] using your account created in step 1. Then, click on the ‘management portal’ link on the top menu to access the NComputing Management Portal. <br> | ||
| + | <br> | ||
[[Image:NComputing ManagementPortal MainPage2.jpg|800px]]<br><br> | [[Image:NComputing ManagementPortal MainPage2.jpg|800px]]<br><br> | ||
Then select the “Software Downloads” tab and click on NComputing NoTouch Center Virtual Appliance to download the OVA file. The NComputing NoTouch Center Virtual Appliance is shipped as an OVA file (Open Virtualization Archive), the single-file version of an Open Virtualization Format image that can be easily used with all current virtualization platforms. | Then select the “Software Downloads” tab and click on NComputing NoTouch Center Virtual Appliance to download the OVA file. The NComputing NoTouch Center Virtual Appliance is shipped as an OVA file (Open Virtualization Archive), the single-file version of an Open Virtualization Format image that can be easily used with all current virtualization platforms. | ||
| + | <br> | ||
<br>[[Image:NComputing ManagementPortal Software Downloads.jpg|border|800px]]<br> | <br>[[Image:NComputing ManagementPortal Software Downloads.jpg|border|800px]]<br> | ||
== Step 3. Install NComputing NoTouch Center Virtual Appliance == | == Step 3. Install NComputing NoTouch Center Virtual Appliance == | ||
| − | Once the Virtual Appliance (OVA file) has been downloaded, please follow the instruction in this link to install the NComputing NoTouch Center Virtual Appliance. : [[NComputing Virtual Appliance]] | + | Once the Virtual Appliance (OVA file) has been downloaded, please follow the instruction in this link to install the NComputing NoTouch Center Virtual Appliance. : '''[[NComputing Virtual Appliance]]''' |
| − | == Step 4. Connect your | + | == Step 4. Connect your EX400 devices to NoTouch Center == |
| − | Once NComputing NoTouch Center Virtual Appliance has been installed, you can then establish | + | Once NComputing NoTouch Center Virtual Appliance has been installed, you can then establish EX400 thin client connections with NoTouch Center in multiple ways. <br> |
| − | Please refer to this link for details. : [[Short introduction (NTC)]] <br> | + | Please refer to this link for details. : '''[[Short introduction (NTC)]]''' <br> |
| − | '''IMPORTANT NOTE:''' ''Before you power on the | + | '''IMPORTANT NOTE:''' ''Before you power on the EX400 thin client, please make sure the device is connected to a display monitor first. |
'' | '' | ||
| − | == Step 5. Register your | + | == Step 5. Register your Ex400 devices with NComputing Management Portal and access EX400 firmware update == |
| − | Once your | + | Once your EX400 devices are connected to NoTouch Center, you can then register your EX400 devices to NComputing Management Portal to access EX400 firmware updates and manage your deployed EX400 devices from NComputing Management Portal. If there are any updates to NoTouch Center, you can also find the software update files here. <br> |
| − | Please refer to this link for details : [[NoTouch Center RX-HDX Client list for device registration]] | + | <br> |
| + | Please refer to this link for details : '''[[NoTouch Center RX-HDX Client list for device registration]]''' | ||
| + | <br> | ||
<br>[[Image:NComputing ManagementPortal Software Downloads 2.jpg|border|800px]]<br> | <br>[[Image:NComputing ManagementPortal Software Downloads 2.jpg|border|800px]]<br> | ||
| − | == Step 6. Upgrade | + | == Step 6. Upgrade EX400 firmware (recommend using NoTouch Center) == |
| − | Once you download the | + | Once you download the EX400 firmware update file from NComputing Management Portal, there are multiple ways to update the firmware to your EX400 devices. We recommend using NoTouch Center to deliver the firmware update.<br> |
| − | Please refer to this link on different ways to update the | + | Please refer to this link on different ways to update the EX400 firmware. : '''[[Firmware Update]]''' |
Latest revision as of 00:27, 29 October 2020
IMPORTANT NOTE:
As of July 1, 2020, NComputing has formed a new partnership with Stratodesk, making the official Stratodesk branded OS and management center available on NComputing devices.
Enterprises and organizations using NComputing thin client products based on NoTouch OS, including RX-HDX, RX-HDX+, RX420(HDX), RX420(STDK) and EX400, can now easily migrate over to the official Stratodesk image.
Please refer to the following helper guide on how to access the latest NoTouch software (NoTouch OS firmware and NoTouch Center) from Stratodesk.
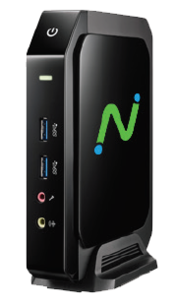
The following is a quick start guide to get you started with the EX400 thin client solution. Once you complete these steps, you will be eligible to:
- Gain access to NoTouch Center and unlock the 1-year bundled software maintenance update subscription that comes with your EX400 purchase to access future software and EX400 firmware updates
- Extended default EX400 hardware warranty (extending the standard 1-year from the date of manufacture warranty to 1-year from the first time seen by NoTouch Center)
- Asset management of deployed EX400 devices with NComputing Management Portal and expedited hardware warranty claims
- The EX400 thin client comes with a native dual display with resolutions up to 4K Ultra HD. By default, the system will output the same image on both screens ("cloned" mode in our terminology) which is usually a safe bet and also works if there is only one monitor connected. In an office scenario where you have two monitors next to each other, you most probably want to have both monitors being part of a large logical desktop, this is called "merged" mode. Please refer to the Multimonitor section for instructions.
Contents
- 1 Step 1. Create a new NComputing Management Portal account
- 2 Step 2. Download NComputing Virtual Appliance (which includes NoTouch Center installation)
- 3 Step 3. Install NComputing NoTouch Center Virtual Appliance
- 4 Step 4. Connect your EX400 devices to NoTouch Center
- 5 Step 5. Register your Ex400 devices with NComputing Management Portal and access EX400 firmware update
- 6 Step 6. Upgrade EX400 firmware (recommend using NoTouch Center)
Step 1. Create a new NComputing Management Portal account
This is where you will be able to register and manage your EX400 devices and download NoTouch Center and future software/firmware upgrades
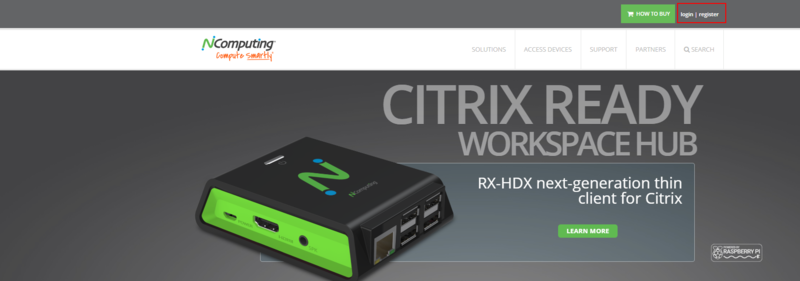
Go to NComputing, click on login|register to create NComputing Management Portal account for your company.

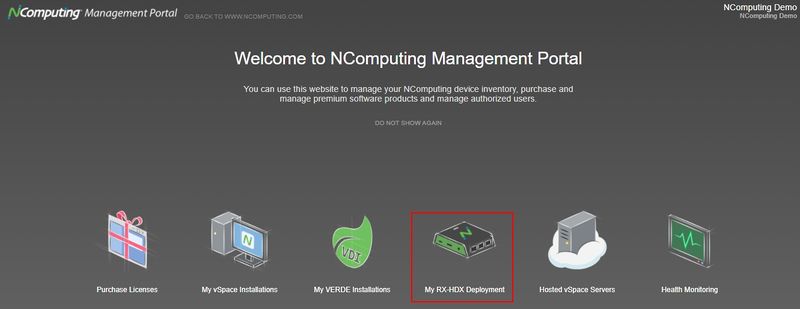
After login, you can find the button for NComputing Management Portal
Step 2. Download NComputing Virtual Appliance (which includes NoTouch Center installation)
Once you have created an NComputing Management Portal account, you will be able to download the NComputing Virtual Appliance. The NComputing Virtual Appliance is a 64bit Linux-based Virtual Appliance (VA) preconfigured to run in a virtual machine environment. It includes NComputing NoTouch Center to manage EX400 thin clients plus an easy-to-use web-based administration interface to perform tasks such as updating or backing up the Virtual Appliance.
To download NComputing Virtual Appliance
Login to NComputing website using your account created in step 1. Then, click on the ‘management portal’ link on the top menu to access the NComputing Management Portal.

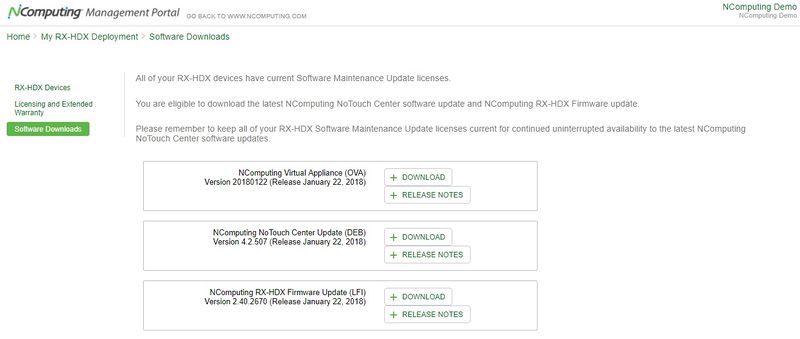
Then select the “Software Downloads” tab and click on NComputing NoTouch Center Virtual Appliance to download the OVA file. The NComputing NoTouch Center Virtual Appliance is shipped as an OVA file (Open Virtualization Archive), the single-file version of an Open Virtualization Format image that can be easily used with all current virtualization platforms.

Step 3. Install NComputing NoTouch Center Virtual Appliance
Once the Virtual Appliance (OVA file) has been downloaded, please follow the instruction in this link to install the NComputing NoTouch Center Virtual Appliance. : NComputing Virtual Appliance
Step 4. Connect your EX400 devices to NoTouch Center
Once NComputing NoTouch Center Virtual Appliance has been installed, you can then establish EX400 thin client connections with NoTouch Center in multiple ways.
Please refer to this link for details. : Short introduction (NTC)
IMPORTANT NOTE: Before you power on the EX400 thin client, please make sure the device is connected to a display monitor first.
Step 5. Register your Ex400 devices with NComputing Management Portal and access EX400 firmware update
Once your EX400 devices are connected to NoTouch Center, you can then register your EX400 devices to NComputing Management Portal to access EX400 firmware updates and manage your deployed EX400 devices from NComputing Management Portal. If there are any updates to NoTouch Center, you can also find the software update files here.
Please refer to this link for details : NoTouch Center RX-HDX Client list for device registration

Step 6. Upgrade EX400 firmware (recommend using NoTouch Center)
Once you download the EX400 firmware update file from NComputing Management Portal, there are multiple ways to update the firmware to your EX400 devices. We recommend using NoTouch Center to deliver the firmware update.
Please refer to this link on different ways to update the EX400 firmware. : Firmware Update

