Difference between revisions of "Printer configuration"
(→Printer Configuration) |
(→Printer Configuration) |
||
| Line 3: | Line 3: | ||
== Printer Configuration == | == Printer Configuration == | ||
| − | The main printer configuration is located under "Drivers/Printer", both locally on the client as in NoTouch Center. Several printer objects can be configured. | + | The main printer configuration is located under "Drivers/Printer", both locally on the client as in NoTouch Center. Several printer objects can be configured. |
| + | |||
| + | === NoTouch Receiver === | ||
| + | |||
| + | When working in the [[Configure NoTouch Receiver|local configuration]], the configuration of a printer object looks like this: | ||
[[Image:NoTouchOS-en-PrinterConfiguration.jpg|none|550px]] | [[Image:NoTouchOS-en-PrinterConfiguration.jpg|none|550px]] | ||
Revision as of 21:53, 8 April 2014
This article explains how to use locally connected printers. We suggest to use network printing and keep printers off the desktop infrastructure but there are situation where printing to locally attached printers in unavoidable.
Contents
Printer Configuration
The main printer configuration is located under "Drivers/Printer", both locally on the client as in NoTouch Center. Several printer objects can be configured.
NoTouch Receiver
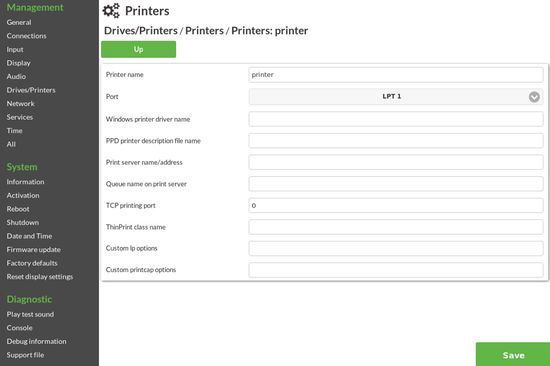
When working in the local configuration, the configuration of a printer object looks like this:
These are the parameters that can be set:
- Printer name. This is an internal printer name. Most people are fine with the default name of "printer". Please do not use spaces or special characters. Just something like printer1, printer2, or so.
- Port. This refers to where the printer is connected to:
- USB 1. The first found USB printer. Please note - USB ports are not numbered, so it does not matter to what port the printer is plugged into. If you have just one USB printer, use USB 1, no matter where it is connected to.
- USB 2. The second found USB printer. It may be a bit tricky to find out which is the first and what is the second, but we find having two USB printers connected to one PC/TC is very very rare.
- LPT 1. The first parallel port.
- LPT 2. The second parallel port.
- COM 1. The first serial port.
- COM 2. The second serial port.
- USBSerial 1. If you use a USB-to-Serial converter.
- Remote Printer. Use a remote/networked printer using the LPD protocol.
- Samba Remote Printer. Use a remote/networked printer using Windows printer sharing.
- Windows printer driver name. This is for logical printer mapping of RDP and ICA protocols. If you type in the name of a Windows printer driver name, the Windows system that you are connecting to will know what driver to use. So you can chose from one of the printer drivers that are installed on the Windows system. The spelling must match the Windows driver name exactly.
- PPD printer description file name.
- Printer server name/address. If the printer port (see above) is set to "Remote Printer" or "Samba Remote Printer", then and only then this parameter has a meaning: the hostname or IP address where to find this remote printer.
- Queue name on print server. If the printer port (see above) is set to "Remote Printer" or "Samba Remote Printer", then and only then this parameter has a meaning: the remote printer or print queue name.
- TCP printing port.
- ThinPrint class name.
- Custom lp options.
- Custom printcap options.
NoTouch Center
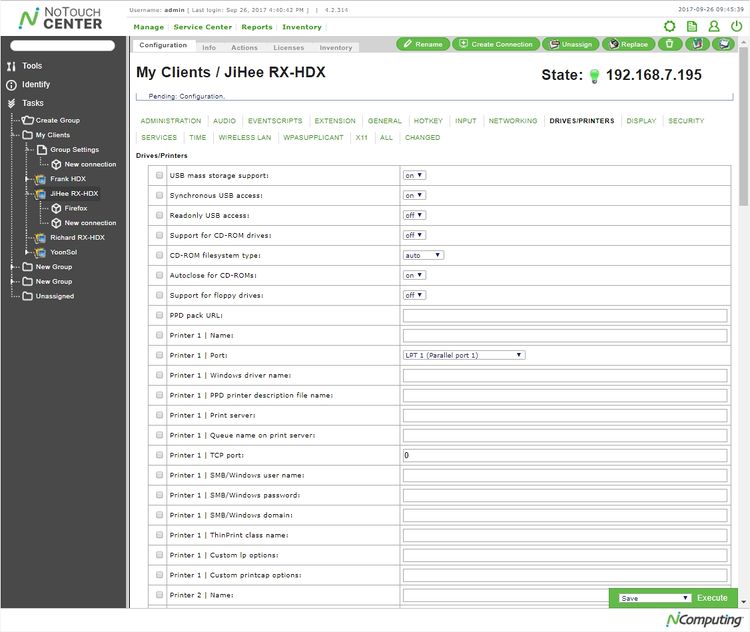
Configuration in NoTouch Center works equally easy - same parameters, same options:
The only visible difference is that in NoTouch Center, the printer objects are already there - you don't have to click on "Add new" as you do on the client. Up to four printer objects can be defined that way.
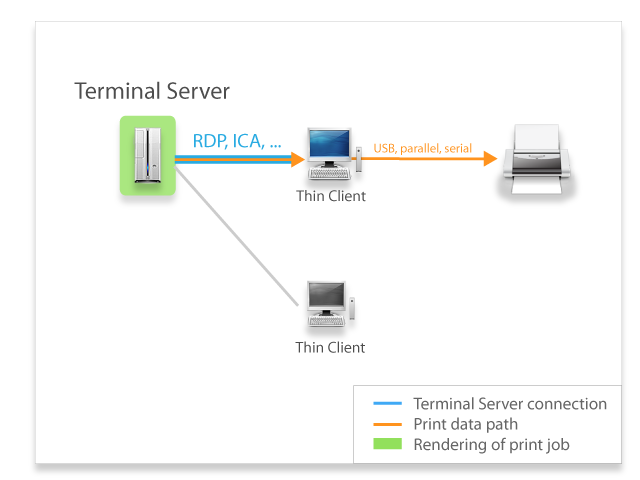
Scenario 1: Using a local printer (connected via USB/LPT/...)
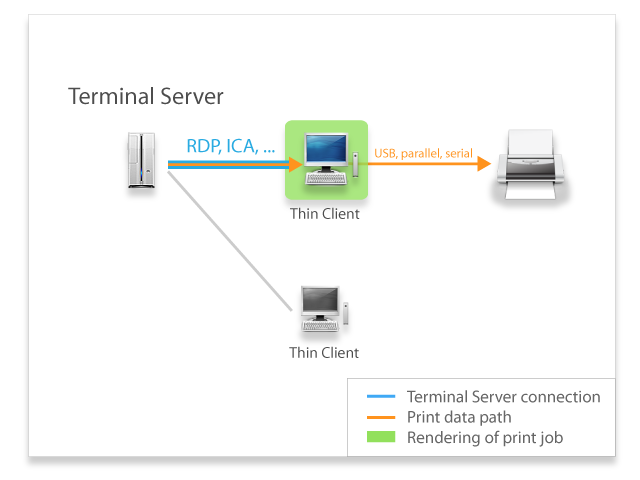
Situation: While logged in to an ICA/RDP session, you want to print directly to your local printer via USB/LPT/..., using an Autocreated Printer on the Remote Terminal Server.
| client-side | server-side |
| Confirm that you have already installed the printer driver
on your Remote Terminal Server and that the system is allowed to create the printer for the user. (Refer to your Citrix or Microsoft documentation.) | |
| Go to the LPD menu (Services -> LPD) and switch the LPD service parameter to ON. Confirm with the 'change' button; also, turn of the CUPS service. | |
Set these parameters in your local client's printer configuration:
|
Windows printer driver:
You get this information from your server's "Printer and Fax" view |
*Confirm by using the 'Change'-button
| |
You can easily check, if your Remote Terminal Server (ICA, RDP) has correctly mapped your local printer settings:
"Client/[YOUR_CIENT_HOSTNAME]/[YOUR_PRINTERNAME]")
|
Scenario 1 for network printers
In most cases, network printers are used directly from the server environment and there's no need to configure anything for the client. But if you need to print from the client directly for any reason (e.g. the printer is in a network segment thtat isn't reachable for the server but only for the client), you can use the same procedure as described above, but for the local printer configuration, you have to configure a network printer instead of a local one. So the needed changes are:
Port: choose "Remote Printer"
TCP printing port: leave it at "0", any other value would suggest you want to configure the client itself as the print box
Remote Print Server: fill in the DNS name or the IP adress of your printer
Scenario 1 - NTC configuration example
In case you have the following parameters:
Printer name: p1
Port: lpt1
Windows Printer Driver: hp LaserJet 1320 PCL 5e
...and you want to set them via the NTC (NoTouch Center), the line to enter for the printcap-Ressource is:
p1|lpt1|hp LaserJet 1320 PCL 5e|
Please mind the trailing pipe (|) at the end of the line!
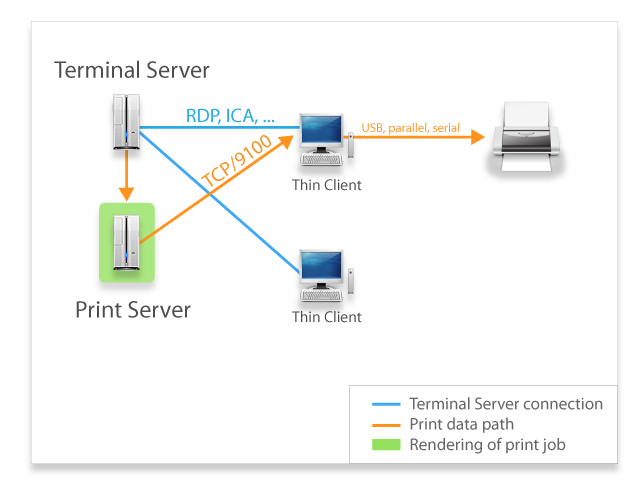
Scenario 2: Standard TCP/IP Printing
Situation: You want to use your Thinclient as mere printbox, using a printserver for spooling and rendering the print jobs. Note: Use this scenario, if you want to make a clients local printer available to multiple clients in the LAN and/or anticipate large print jobs.
How to configure standard TCP/IP printing
Client-side (printbox)
Set these parameters in your local clients Printer configuration:
- Printer name: Here you define a name for the printer. This name may not contain spaces or special characters, only letters and numbers are allowed.
- Port: Choose the appropriate option for your client
- TCP printing port: set to "9100" (standard printing port)
Confirm by using the 'Change'-button
Save your changes with the "Save"-button,
Restart the client and your local printer is ready
Server-side
Install the printer driver to your printserver.
Use a login script on the Remote Terminal Server to assign the printer.
Scenario 2 - NTC configuration example
In case you have the following parameters: Printer name: p1 Port: lpt1 TCP Printing port: 9100 ...and you want to set them via the NTC (NoTouch Center), the line you enter for the printcap-Ressource is: p1|lpt1|||9100
Scenario 3 - "Driverless" Printing
Situation: Similar to Scenario 1, you let a ThinClient do the handling of print jobs, although without having to install the printer driver on the Remote terminal Server - it is installed as a CUPS driver on the Client.
How to configure a "driverless" local printer
Server-side
Confirm that the system is allowed to create the printer for the user. (Refer to your Citrix or Microsoft documentation.)
Client-side
Go to the 'CUPS printing' menu: Systems configuration -> 'Services' -> CUPS printing Turn the 'Start CUPS' setting to ON.
Confirm by using the 'Change'-button
Set these parameters in your local clients Printer configuration:
- Printer name: Here you define a name to the printer.
- This name may not contain spaces or special characters, only letters and numbers are allowed.
- Port: Choose the appropriate option for your client.
- Printer driver: Choose a CUPS printer driver compatible to your local printer.
Confirm by using the 'Change'-button Save your changes with the "Save"-button, restart the client and your local printer is ready
Scenario 3 - NTC configuration example
In case you have the following parameters:
Printer name: p1
Port: lpt1
Printer Driver: laserjet.ppd
...and you want to set them via the NTC (NoTouch Center), the line you enter for the printcap-Ressource is:
p1|lpt1||||laserjet.ppd|
Mind the trailing pipe (|) at the end of the line!
Configuring printers via NTC
To configure printers using the NTC the parameter printcap must be set accordingly.
Valid Syntax
- printername|url|drivername|printer_parameters|standard_tcpport|ppdfile|lpoptions
- printername|url|drivername|printer_parameters|standard_tcpport
- printername|url|drivername|printer_parameters
Parameters
| printername | The printername must not contain spaces or special characters, only letters and numbers are allowed. |
| url | The following are valid values: "com1", "com2", "lpt1", "lpt2", "usb1", "usb2", "tcp://Adress_of_remoteServer" and "lpd://remoteMac/remotePrinter" |
| drivername | The drivername is the exact name of the driver on your Server. You get this information from your server's "printer and fax" - view. Be aware that this is case sensitive. |
| printer_parameters | key/value pairs of the printer parameters delimited by ":", e.g.: "pl=6:pw=132" |
| standard_tcpport | The Thinclient can act as a print server, this defines the listening TCP port (set to "0" if the client shouldn't listen for incoming print jobs) |
| ppdfile | CUPS driver file |
| lpoptions | extended options |
Notes
- "|" is used as a delimiter
- If you are using more than one printer, the printers must be separated by a comma ",".
- The drivername is the exact name of the driver on the TS.
- The first printer mentioned in the printcap parameter is the default printer.
- Check, that the lpt or usb board is enabled in the bios
- When using the lpt port, be sure, that the EPP (Enhanced Parallel Port) modus is defined in the bios.
Examples
- Two printers, a "magicolor 2200" on com1 and a HP Laserjet via lpd:
- com1|com1|magicolor 2200 DeskLaser|pl=6:pw=132,silja|lpd://silja/lp_par|HP Laserjet 2100|
- One printer - an "HP Laserjet 2100" via lpd:
- silja|lpd://silja/lp_par|HP Laserjet 2100|
- One printer via CUPS:
- remoteCupsPrinterName|tcp://addressOfCupsServer||||laserjet.ppd|
