Updating the Virtual Appliance
The NComputing Virtual Appliance is a "server-type" Linux system and as such of course can be updated. In fact, the Virtual Appliance consists of three separate modules when viewed from an updating and maintenance perspective:
- The NComputing Virtual Appliance software, including the web-based configuration/administration console and its backend programs
- NoTouch Center
- The underlying OS with all its packages and software modules
For any type of updates to work, your VA needs to be able to connect to the Internet, specifically to the NComputing and Ubuntu update servers, outbound port 80 (HTTP) and port 443 (HTTPS). Without Internet connectivity, you may not be able to update, but you might still have internal security threats, such as disgruntled coworkers. Therefore our recommendation is to keep your systems up-to-date.
Contents
Update control
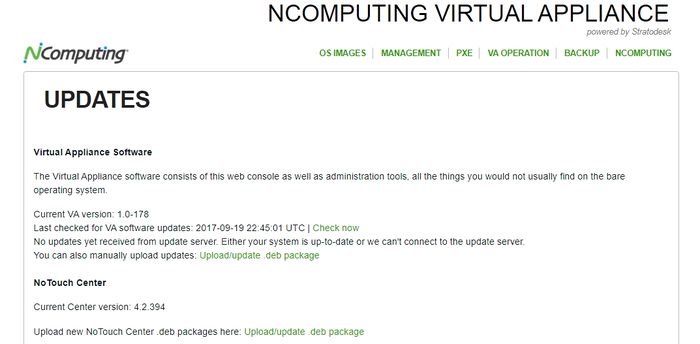
In older versions of VA Console:
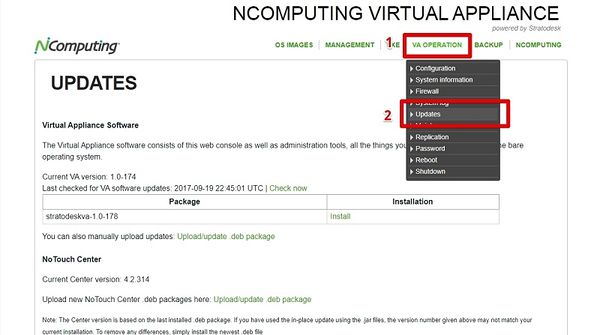
Go to "VA Operation" -> "Updates" in the main menu to get to this screen:
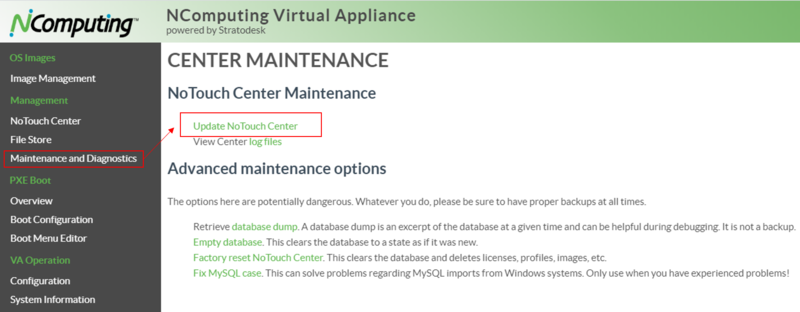
In newer versions of VA console, the UI selection is somewhat different:
- In the left column, select 'Maintenance and Diagnostics'
- Click on 'Update NoTouch Center'
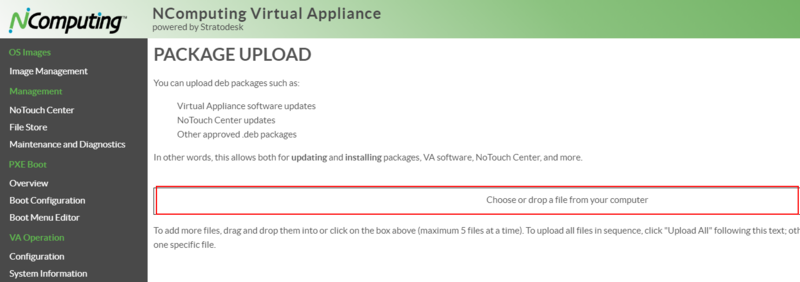
- A upload UI will be displayed to allow uploading of deb packages for Virtual Appliance software updates or NoTouch Center updates
Virtual Appliance software
Web-based update
Our virtual appliance has its own easy-to-use update mechanism for the Virtual Appliance:
- Create a backup or VM snapshot.
- Go to "VA Operation" in the main menu and then choose "Updates".
- If there is an update available, it will be displayed - click on "Install". If there is none available or the system can not connect to the NComputing update service, it will display a message accordingly.
- If possible, reboot the system.
Manual update
In case this update mechanism does not work, for example for firewall reasons, you can get the update .deb file from our download portal and apply it here. Click on the "Upload/update .deb package".
Notes
Note: It is important for you to understand that "Virtual Appliance software" refers to the web console, the program logic behind creating the PXE configuration etc. It does not refer to the Virtual Appliance as a whole, which is an Ubuntu server based system. The Virtual Appliance software is just one package, named stratodeskva, that is installed on this server system.
NoTouch Center
NoTouch Center can also be updated using the .deb package upload mechanism.
- In the older versions of VA Console, select "VA Operation" in the main menu
- Click on "Updates"
- Scroll to the "NoTouch Center" header and click on "Upload/update .deb package"
In newer versions of VA console, the UI selection is somewhat different:
- In the left column, select 'Maintenance and Diagnostics'
- Click on 'Update NoTouch Center'
- A upload UI will be displayed to allow uploading of deb packages for Virtual Appliance software updates or NoTouch Center updates
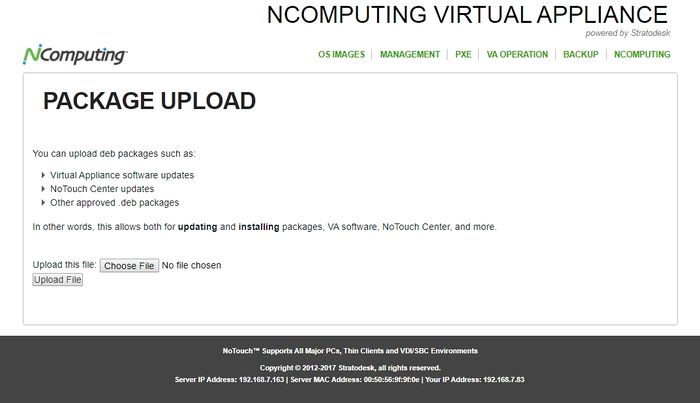
In the page that appears now, upload the NoTouch Center update file (a .deb file).
NoTouch Center will be installed and restarted. Please allow at least one minute for NoTouch Center to reconfigure itself. Do not reboot the VA immediately.
You might also want to have a look at this article about NoTouch Center update: Updating NTC
Underlying Operating System updates
Security updates are configured to be installed automatically in an unattended mode, using the unattended-upgrades package (for the Linux details, see [1]). This may or may not work in your configuration (think of firewalling) so it is wise to check.
Web-based updating
Click on "Check now" to check for and install latest updates. The first time it will take a long time without browser interaction, but do not interrupt. It will take its time. If it doesn't work via the browser, use the #Shell-based updating mechanism described below.
Please note that not all updates are security updates. Most are simple bug fixes and general improvements. So a large number of updated packages doesn't mean you have had that many security problems waiting.
Shell-based updating
However, you may want to check and install updates yourself, as there are often convenience updates that can only be installed manually:
- Create a backup and/or VM snapshot
- Log in to the VA via SSH - see this article for more information: SSH login
- In short, get PuTTY[2] and connect to the system using the "notouchadm" username and the password that you had set
- Type in this command to get administrator ("root") privileges. When asked for a password, enter the password you used for login again.
sudo su
- Type in this command (spaces and case do matter!):
apt-get update && apt-get dist-upgrade && apt-get autoremove
- Usually this will take some time and it will run without questions. If the system displays dialog boxes about new configuration files or similar, we suggest to select "keep current version".
- If, and only if, the system complains about an update being interrupted and suggests to run sudo dpkg --configure -a then please execute
dpkg --configure -a
- Also, if there are errors about unmet dependencies, please execute
apt-get install -f
- If, and only if, the system complains about an update being interrupted and suggests to run sudo dpkg --configure -a then please execute
- After the process has run through well and there have been packages updated, we recommend to reboot the system afterwards unless you have PXE-clients depending on the machine
Recovery from a failed update
If your system gets totally broken and does not boot any more and potentially stops a weird textual screen, recover using these steps:
- Reboot the VM holding the Shift key on boot. This will enter the boot loader.
- Select "Advanced options". When asked for username and password, use "admin" and your password.
- The system will then show a list of Linux kernels available. The newest is most likely the one that is broken, so select an older one. At this point do net yet use recovery mode, simply select an older kernel without the "recovery mode tag".
- If the system boots into this kernel, you will see a normal looking menu screen and the system will be reachable by browser.
- Log in to the VA via SSH - see this article for more information: SSH login
- In short, get PuTTY[3] and connect to the system using the "notouchadm" username and the password that you had set
- Type in this command to get administrator ("root") privileges. When asked for a password, enter the password you used for login again.
sudo su
- Type in this command (spaces and case do matter!):
apt-get update && apt-get dist-upgrade && apt-get autoremove
- Usually this will take some time and it will run without questions. If the system displays dialog boxes about new configuration files or similar, we suggest to select "keep current version".
- If, and only if, the system complains about an update being interrupted and suggests to run sudo dpkg --configure -a then please execute
dpkg --configure -a
- Also, if there are errors about unmet dependencies, please execute
apt-get install -f
- If, and only if, the system complains about an update being interrupted and suggests to run sudo dpkg --configure -a then please execute
- Log in to the VA via SSH - see this article for more information: SSH login
- Repeat if necessary. Run
apt-get updateif the system complains about something not to be found. - Reboot after both these ran through without errors.
If you can not get any kernel to boot, you need to use a backup.
Operating System Update Latest History
The last section on this screen is an excerpt from the log files. It tells you (latest on top) which packages where updated and when. Linux aficionados will recognizes it's the inverted apt-get history log. If the latest update is more than two weeks back, you should certainly click on "Check Now".
