Reports
NoTouch Center comes with a builtin reporting engine that allows you to get beautiful PDF, Word, Excel, Powerpoint, OpenOffice, CSV or other reports with a simple mouseclick. The framework is extensible and you can use an open-source software to generate your own report templates, or, if you want to use your own reporting tool, you can simply connect to the underlying database on your own.
NoTouch Center includes the open-source de-facto standard for reporting, Jaspersoft JasperReports Library [1] and several carefully crafted reports.
Contents
Builtin reports
After installing NoTouch Center, you have several ready-to-run reports installed. Click on the "Reports" main menu item and you are presented NoTouch Center's reports.

The builtin reports are:
- Client Overview. An overview of all your client devices and your group hierarchy.
- Client OS Images. Shows distribution of client OS - "firmware" - images.
- Client Hardware. A hardware-centric report, grouped and ordered by endpoint hardware type.
- Clients Peripherals. Shows a peripherals/components centric overview of your clients.
- Last Contact. Specifically made to find devices that have not been in contact in NoTouch Center for a longer time, i.e. machines that may have been disposed already but not deleted from NoTouch Center. It is sorted with the largest number of not-seen days first. A one day cut-off date ensures that currently running devices are not shown, not even at the bottom of the list.
All the reports can be exported to these formats:
- PDF. Portable Document Format.
- XLSX. Microsoft Excel/Office XML.
- XLS. Microsoft Excel.
- DOCX. Microsoft Word/Office XML
- PPTX. Microsoft PowerPoint/Office XML.
- ODT. OpenDocument Text.
- ODS. OpenDocument Spreadsheet.
- RTF. Rich Text Format.
- XML. XML/Extensible Markup Language.
- CSV. Comma-separated text.
Extending using Jaspersoft Studio
To extend NoTouch Center with your own custom JasperReports templates, please download Jaspersoft® Studio from the Jaspersoft web page [2].
Generally speaking, reporting means to query a data source and combine the resulting data with a report template; and have a reporting engine compile/format/render the final report document. NoTouch Center includes the Jaspersoft Jasper Reports Library, it serves as the reporting engine. NoTouch Center provides several datasources, so all you need is query and template. Everything else will be taken care of.
Datasources
NoTouch Center provides these datasources:
- SQL access via its own JDBC/Database layer. This datasource will accept any SQL query that you design for your purposes. To design your own queries, you need a fair understanding of SQL [3], databases in general and, specifically, the NoTouch Center database layout. See this example query and query result in textual representation:
select COID,NAME FROM CONFIGOBJECT WHERE COTYPE=3 AND NAME LIKE "%00C2%";
+------+-----------------+
| COID | NAME            |
+------+-----------------+
|    6 | LIS000C29263944 |
+------+-----------------+
1 row in set (0.00 sec)
- Client_Overview, an internal datasource. Any report file name ending in "Client_Overview.jrxml" will automatically be connected with this datasource. For ease of development, get the Client_Overview.csv file from the reports subdirectory of your NoTouch Center installation.
ClientName,GroupName,HostName,IP,MAC,Release,SystemSerial,Product,Vendor,LastContact,SerialNo
Client 1,Group 1,HOSTNAME,192.168.0.2,00:AB:CD:12:34:56,2.39.0-EEs-k305-131211,34543223,Special PC,Supercomputer Corp.,2012-04-23 16:00:00,100
Client 2,Group 1,NONAME,192.168.0.2,00:CF:76:21:43:65,2.38.120-EEs-k206-131112,34543780,Special PC,Supercomputer Corp.,2012-04-23 16:30:00,101
Client 3,Group 2,BATMAN,192.168.1.5,00:1C:4A:16:43:56,2.39.0-EEs-k305-131211,3454345,Special PC,Supercomputer Corp.,2013-05-20 16:00:00,102
Client 4,Group 2,ROBIN,192.168.1.6,00:1D:3B:66:6A:56,2.39.0-EEs-k305-131211,ATR53231X,Other PC,Cheap Computer Inc.,2011-03-20 16:00:00,103
- Last_Contact, another internal datasource. Any report file name ending in "Last_Contact.jrxml" will automatically be connected with this datasource. For ease of development, get the Last_Contact.csv file from the reports subdirectory of your NoTouch Center installation.
ClientName,GroupName,LastEventDate,Days
Client1,Group 1,2012-10-20 16:00:00,550
Client2,Group 2,2013-10-20 15:00:00,350
- Clients_Peripherals, another internal datasource. Any report file name ending in "Clients_Peripherals.jrxml" will automatically be connected with this datasource. For ease of development, get the Last_Contact.csv file from the reports subdirectory of your NoTouch Center installation. It is peripherals/components-centric as it contains one line per device, i.e. a single client will show up multiple times, each time for another peripheral device.
ClientName,GroupName,HostName,IP,MAC,Release,SystemSerial,Product,Vendor,LastContact,SerialNo,PVendor,PBrandname,PUniqueId,PClassType,PConnType,PID
Client 1,Group 1,HOSTNAME,192.168.0.2,00:AB:CD:12:34:56,2.39.0-EEs-k305-131211,34543223,Special PC,Supercomputer Corp.,2012-04-23 16:00:00,100,AMD,PCnet32 LANCE,00:AB:CD:12:34:56,network,PCI,0123:4567
Client 1,Group 1,HOSTNAME,192.168.0.2,00:AB:CD:12:34:56,2.39.0-EEs-k305-131211,34543223,Special PC,Supercomputer Corp.,2012-04-23 16:00:00,100,Canon,BubbleJet 1234,,printer,USB,9876:FEDC
Client 1,Group 1,HOSTNAME,192.168.0.2,00:AB:CD:12:34:56,2.39.0-EEs-k305-131211,34543223,Special PC,Supercomputer Corp.,2012-04-23 16:00:00,100,ClearView,Dream Monitor,123,monitor,VGA,
Client 2,Group 1,NONAME,192.168.0.2,00:CF:76:21:43:65,2.38.120-EEs-k206-131112,34543780,Special PC,Supercomputer Corp.,2012-04-23 16:30:00,101,AMD,PCnet32 LANCE,00:CF:76:21:43:65,network,PCI,0123:4567
Client 3,Group 2,BATMAN,192.168.1.5,00:1C:4A:16:43:56,2.39.0-EEs-k305-131211,3454345,Special PC,Supercomputer Corp.,2013-05-20 16:00:00,102,AMD,PCnet32 LANCE,00:CF:76:21:43:65,network,PCI,0123:4567
Client 4,Group 2,ROBIN,192.168.1.6,00:1D:3B:66:6A:56,2.39.0-EEs-k305-131211,ATR53231X,Other PC,Cheap Computer Inc.,2011-03-20 16:00:00,103,Intel,EtherExpress,00:1D:3B:66:6A:56,network,PCI,8086:1234
Client 4,Group 2,ROBIN,192.168.1.6,00:1D:3B:66:6A:56,2.39.0-EEs-k305-131211,ATR53231X,Other PC,Cheap Computer Inc.,2011-03-20 16:00:00,103,ClearView,Dream Monitor,124,monitor,VGA,
In other words, you can develop on your development machine using your own, locally configured datasources. Most likely you will have configured a JDBC datasource that allows you SQL access - see Direct MySQL access for how to open up our MySQL installation - and the other two datasources from the sample CSV files. If you then transfer your .jrxml to NoTouch Center, place them into the reports subfolder.
The file name matters! It is the file name of your .jrxml files that defines which data source will be used in NoTouch Center! By default, NoTouch Center will always apply the SQL datasource to .jrxml files, unless their names end in "Last_Contact.jrxml" (Last_Contact datasource) or "Client_Overview.jrxml"/"Client_Hardware.jrxml"/"Client_OS_Images.jrxml" (Client_Overview datasource) or "Clients_Peripherals.jrxml" (Clients_Peripherals datasource). This was chosen so that it is easy for you to generate reports derived from our sample reports and not being confused about datasources. For instance, a file named My_Personal_Client_Overview.jrxml would use the same datasource as the standard Client_Overview.jrxml.
Prepare your Jaspersoft Studio Development Environment
In this example we guide you through the complete setup process from an empty machine to creating your first report. We assume you have a productive NoTouch Center installation running on another host with IP address 192.168.2.9 that you want to query.
Required Downloads and Installation
- Preparation.
- Make sure your PC has Java installed. If not, get it from http://www.oracle.com/technetwork/java/javase/downloads/index.html - we suggest installing the Java JDK ("developer kit"), not just the JRE ("runtime environment").
- Download the free Jaspersoft® Studio software from http://community.jaspersoft.com/project/jaspersoft-studio/releases
- Get the MySQL JDBC driver from http://dev.mysql.com/downloads/connector/j/
- Install NoTouch Center locally (Optional, but recommended). If you do not want to do that, please get at least the *.csv files from the reports subfolder - see File exchange if running on a NComputing Virtual Appliance
- Install Jaspersoft Studio on your system.
- On first launch, it will ask you a few questions:
- Working directory name. Most people will be fine with the default and just say "OK"
- Do you allow usage statistic/feedback - "phoning home" to Jaspersoft. Please make up your own opinion on this.
- It will then display the blue "Welcome" screen. Click on "Get Started".
Data Sources
To get started, we need to set up the Data Adapters. They mimic the "real" data sources that the engine inside NoTouch Center provides. Thus, you can use the reports locally of course in your development PC, but also you can later deploy the reports to a NoTouch Center installation.
In Jasper Studio, look on the left side where the "Repository" bar is. Right-click on "Data Adapters"

Next, you are presented a dialog that contains many, many options. We will now create data adapters for all our data sources.
CSV data sources
First we add our CSV data sources. In the dialog on your screen, select "CSV File" and then click Next.

The next dialog looks overwhelming, but there is no reason to worry. Let's go forward like this:
- First, click on the "File" button. A little File-Open-dialog will appear.
- Now point this little dialog to the Client_Overview.csv file:
- If you have installed NoTouch Center, look into the NoTouch Center installation folder
- If you have simply copied the files from another installation (see File exchange), you know where you have saved them
- Enter a descriptive name into the "Name:" text field (uppermost text field). We suggest Client_Overview.csv
- Click the "Test" button on the bottom of the dialog.
- This should simply bring up a message box saying "Successful"
- Then click on the wide "Get column names from the first row of the file" button in the middle of the dialog. Now the column names should appear.
After this procedure, the dialog will look like this:

Now click the "Finish" button. Hooray! Your first datasource is ready and you will see the new entry "Client_Overview.csv" under "Data Adapters" in the Repository bar!
Now wait a moment, before you start designing reports, let's repeat this whole step again for all other available NoTouch Center .csv files that you have - at least you should add "Clients_Peripherals.csv" and "Last_Contact.csv"!
Actually, most likely you will want to do SQL queries as well. So please read on, let's add SQL database adapters now.
JDBC/MySQL data sources
Once again you start with adding adding a "Data Adapter" as described above. However, this time you select "Database JDBC Connection" instead of "CSV File". Click "Next".
First, we will add a data source to the local NoTouch Center installation on this machine. If you didn't install a local instance, it is fine to just connect to the production system (see below).
The next dialog contains information about which JDBC driver to use. Yes this sounds complex, but in fact it is not. Follow these simple steps:
- First, open the "JDBC driver" dropdown and look for "MySQL (com.mysql.jdbc.Driver)". The list is long and overwhelming. Just look for the mentioned entry and select it.
- Edit the JDBC Url parameter to look like this:
-
jdbc:mysql://localhost/easyadmin
-
- Set the Username field to "easyadmin"
- Set the Password field to "easyadmin"
- Assign a descriptive name: We suggest "Local NoTouch Center DB"
- Now comes another mildly tricky part: Below the text fields you will find three tabs, "Database location"/"Connection properties"/"Driver Classpath". Click on "Driver Classpath"
- If you have installed the MySQL Connector/J package using the MSI package, look into C:\Program Files (x86)\MySQL and click on the included .jar file.
- If you have downloaded a ZIP file, unzip the contents, put them in a permanent location and point the Driver Classpath dialog to this location.
- Click "Test". The system will say "Successful"
The dialog should then look like this. When done, click "Finish".

Now we repeat these steps for our production system.
- First, make sure the production system has an open MySQL network access: Did you follow the instructions in Direct MySQL access?
- Second, go through the exact same steps as described above for the "local NoTouch Center" system. There is only one difference:
- The JDBC Url must point to your production system. Replace the "localhost" portion with the actual host name or IP address of your production system. In our example, the JDBC Url has to look like this:
jdbc:mysql://192.168.2.9/easyadmin
- The JDBC Url must point to your production system. Replace the "localhost" portion with the actual host name or IP address of your production system. In our example, the JDBC Url has to look like this:
Great! You now have all datasources ready. Let's get ready to design our first report!
Non-MySQL JDBC data sources
Should you run NoTouch Center on a non-standard database (i.e. not on MySQL), then the instructions above do not relate to your setup exactly, but they are very similar. All you need to do is download the JDBC drivers for your database, e.g. Oracle JDBC drivers or the jTDS JDBC driver for Microsoft SQL Server at http://jtds.sourceforge.net
Create your own reports
Reports based on builtin datasources
We will start with a report based on a 'builtin' datasource (which is represented here as a CSV datasource).
- In Jaspersoft Studio, click on the "File" main menu item and select "New"->"Jasper Report".
- Select one of the report templates. Note: We usually avoid the discussion of what template is "beautiful" and which one is "not so beautiful". For now, please let's just select "Simple Blue" and click Next.
- Note: For now, do not select a template that includes graphics files or non-standard fonts. It will make deployment harder.
- Assign a file name. Remember what you have read above - the name of the report will later on define the data source. So, in this example, we will use "Client_Overview.csv", so lets name this sample report "My_First_Client_Overview.jrxml". Click Next.
- Select a Data Adapter. In this example, go with "Client_Overview.csv - CSV File". Click Next.
- You will see all columns of the Data Adapter on the left. Now select ClientName, and click the ">" button so that ClientName moves to the right. Repeat for "GroupName" and, to make the report more interesting, "IP". Click Next.
- The next dialog is about Sorting and "Group By". Why not indeed group the clients by group name. So Move "GroupName" to the right. Also, click the "Use group fields as sort fields". This is will aggregate the clients of each group. Click Next.
- Great. All done. Now click Finish. Your screen will look similar to this:

What you see is the "Design view" of the report. If you want to see how your report would look like in reality, click on the "Preview" tab (note the three tabs pretty much in the middle of the screen, a bit to the bottom - "Design"/"Source"/"Preview"). You may also maximize the "My_First_Client_Overview.jrxml" pane inside Jasper Studio. The screen will then look like this:

The report was generated exactly as we wanted the system to do: Grouped by the "Group Name" column - we only have two groups, and then clients then listed per group with IP address. (You may compare with the sample given above in the #Datasources section.
From this point on, you can do everything you want to design a beautiful report. You can edit the titles, edit layouts, include your own corporate design and branding, whatever. Please note that generating beautiful reports is not an easy task and it requires a different skill set than system administration does. Please contact your vendor if you need help.
Reports based on an SQL query
Now it is time to generate a report based on an SQL query.
- In Jaspersoft Studio, click on the "File" main menu item and select "New"->"Jasper Report".
- Select one of the report templates. Note: We usually avoid the discussion of what template is "beautiful" and which one is "not so beautiful". For now, please let's just select "Simple Blue" and click Next.
- Note: For now, do not select a template that includes graphics files or non-standard fonts. It will make deployment harder.
- Assign a file name. Let's just call it "Simple_Client_List". Click Next.
- Select a Data Adapter. In this example, go with "Local NoTouch Center DB - Database JDBC Connection". If you did not install a local NoTouch Center instance, please chose the "production data source". Click Next.
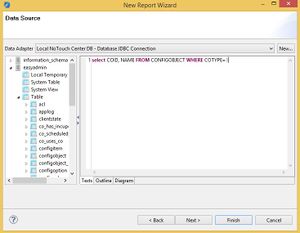
- You will now see a browser pane to the left that shows you database schemas and tables and a large text field to the right (see screenshot). You may of course use the GUI to your advantage, but for our plain simple client list we type in a SQL query:
select COID, NAME FROM CONFIGOBJECT WHERE COTYPE=3. Click Next. - You will see all columns now that are the result of our query. of the Data Adapter on the left. Now select COID, and click the ">" button so that COID moves to the right. Repeat for "NAME". Click Next.
- The next dialog is about Sorting and "Group By". Let's group/sort by NAME. Move NAME over. That way our report will be sorted by client names, alphabetically. Click Next.
- Great. All done. Now click Finish. Your screen will look similar to this:


What you see is the "Design view" of the report. If you want to see how your report would look like in reality, click on the "Preview" tab (note the three tabs pretty much in the middle of the screen, a bit to the bottom - "Design"/"Source"/"Preview").
Now we admit that this report is not that interesting. However its purpose is to show you how to create reports based on SQL queries. From this point on you have all the power that is necessary to query the NoTouch Center database, however you want. Please see Database layout for more information.
Aside from the SQL data source, from this point on, you can do everything you want to design a beautiful report. You can edit the titles, edit layouts, include your own corporate design and branding, whatever. Please note that generating beautiful reports is not an easy task and it requires a different skill set than system administration does. Please contact your vendor if you need help.
Deploy a report to NoTouch Center
As you already know, NoTouch Center contains the necessary components to generate reports on its own.
- Rethink what files make up your report - it might not only be .jrxml file! Carefully look into your JasperStudio working directory.
- Did you include any graphics? jpg/png files?
- Any special fonts?
- And of course the jrxml file.
- Check the file name of the jrxml file. If you used a CSV datasource, make sure it follows the filename convention. On an SQL datasource, use any filename that does NOT follow the CSV convention.
- Copy the .jrxml file to the NoTouch Center installation, into the reports/ subfolder. If running on a NComputing Virtual Appliance, check out File exchange for more information.
- Copy any embedded images (jpgs, pngs), fonts or other linked files into the installation's main directory.
- Connect with your browser and log in - go to "Reports" - you will see your report in the list!
- Download a PDF version of the report. If (and only if) your query results in some actual rows, you will see a nice report result. Hooray! Your first report is done!

Troubleshooting
In case the generated file is empty, or no file is downloadable at all, please check the Log! Most likely report errors happen because of:
- Empty query result
- Filename/datasource mismatch. Remember, for the "builtin" datasources the report file name must follow a convention. If not, NoTouch Center will assume you want use SQL.
- Embedded graphics files missing. Please review the deployment section above again about copying embedded graphics files.
- Standard fonts like Times New Roman missing. Please see the font section below.
- Special, custom, non-standard fonts. Please review the deployment section above again about copying fonts.
- Absolute paths of embedded files. We found that JasperStudio by default creates relative paths names which is good. We could imagine situations though where things like C:\MyReports\flower.png get embedded and these won't work in the deployment system of course.
Yes, you read that first bullet point correct. An empty query result will lead to a blank PDF (no header, no footer, just empty) - this is one of the things we found very peculiar about JasperReports.
Make regular TrueType fonts available to a NComputing Virtual Appliance
If you are running a NComputing Virtual Appliance you may have to make the Microsoft TrueType fonts available to the system. We can not ship the Virtual Appliance to you with these fonts because you have agree to a Microsoft EULA.
- Log in to the NComputing Virtual Appliance using SSH and gain root privileges.
- Type in:
apt-get update. On a new, just deployed VA this will take ca. 5 to 10 minutes. On an up-to-date system less than one minute. - Type in:
apt-get install --reinstall ttf-mscorefonts-installer - The system will ask you if it is ok to install several packages. Hit the Y key to say Yes.
- Now read the Microsoft EULA, call your lawyer (just kidding), when done, hit Enter to select the "EXIT" button
- When asked if you accept, highlight "Yes" with the cursor keys and hit Enter.
- The system will now download the TrueType fonts for you.
This procedure will give you access to the basic Microsoft fonts like Arial or Times New Roman. If you use any "special" fonts, you will have to take care for those separately.
Custom reports
You can use any reporting tool you like as long as it can connect to the database. The most widely used (and also most underestimated...) reporting program is Microsoft Access. Please see Direct MySQL access for instructions on how to open up your database to allow connections from third-party tools.